Printer-Installation for MAC OSX (and Unix Systems)
NOTE:
-- Access: Only with EDUROAM,Fixed and Valid IP from the GNZ,Wisschenschaftsnetz,
-- No Access from: DHCP (141.14.151.x) or 10.0.xxx Networks!!!
-- a valid FHI Account for the PRINTING Printserver
Content (hide)
1. Printer Installation for MacOS - Direct
0.) Download the correct Printer driver for you device and install it!
- For Lexmark Printers use the MAC Universal Print Driver:
https://downloads.lexmark.com/downloads/drivers/Lexmark_UC1_PrinterSoftware_08042022.dmg
- For HP Printers use the HP Universal Driver:
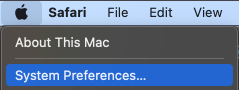
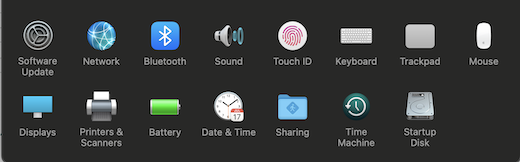
1. From the Apple menu choose System Preferences.
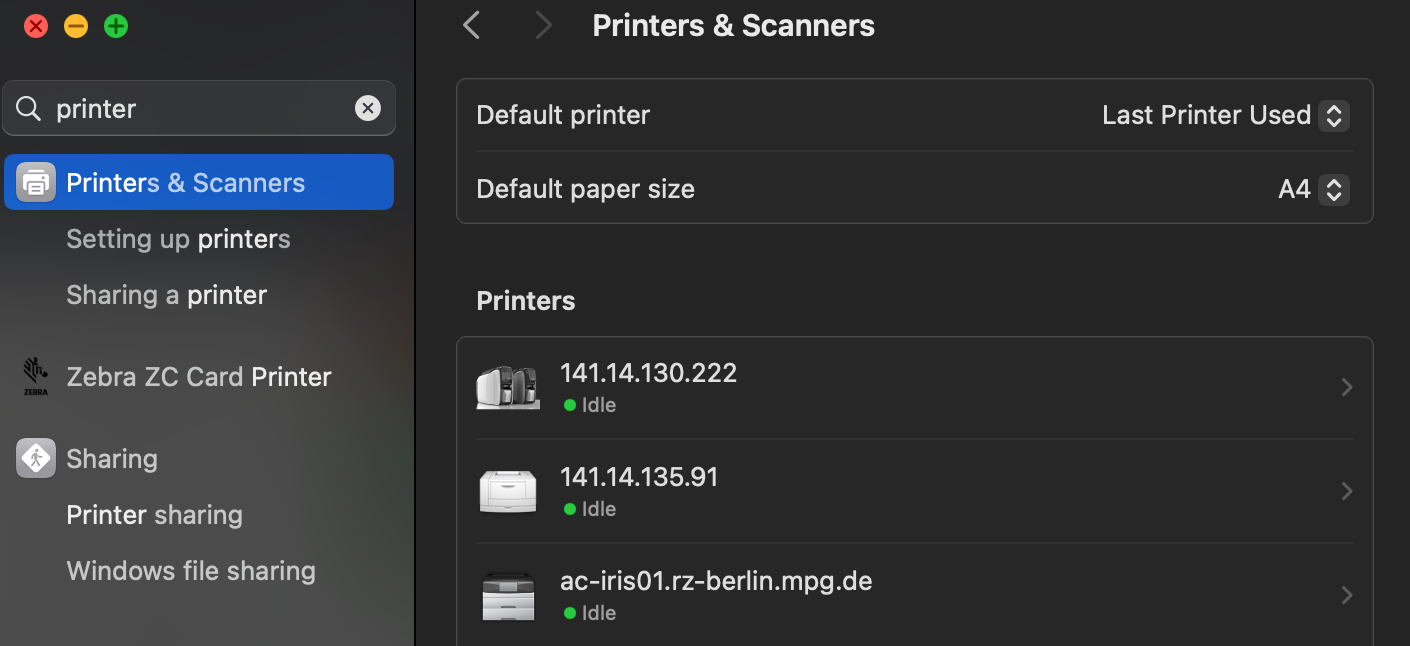
2. From the View menu choose Print & Scanners.
3. If the lower left padlock is locked, click it and enter an administrator name and password to unlock it.
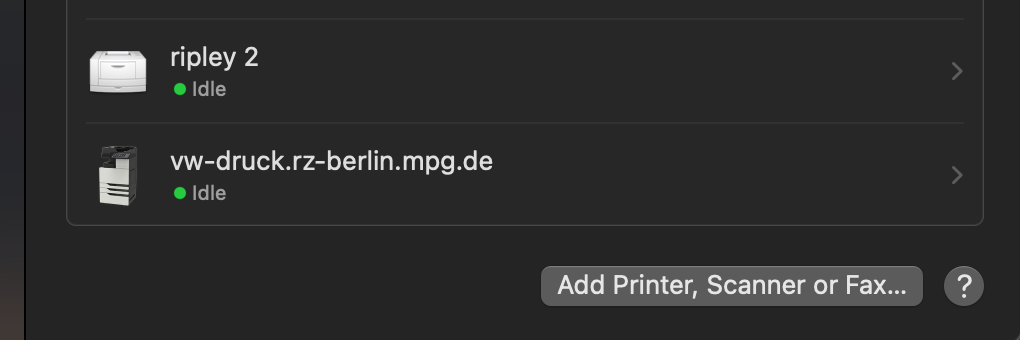
4. Click the "+" (plus) icon at the bottom of the "Printers" pane to open the "Add Printer" window.
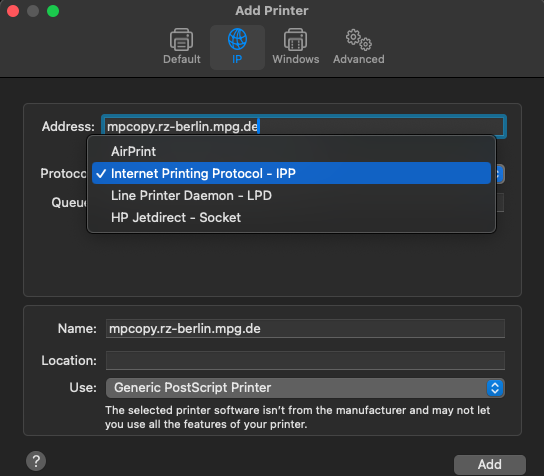
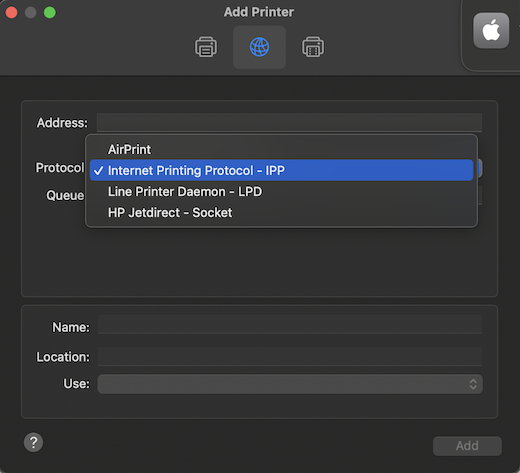
5. Select "IP"-Icon on the toolbar.
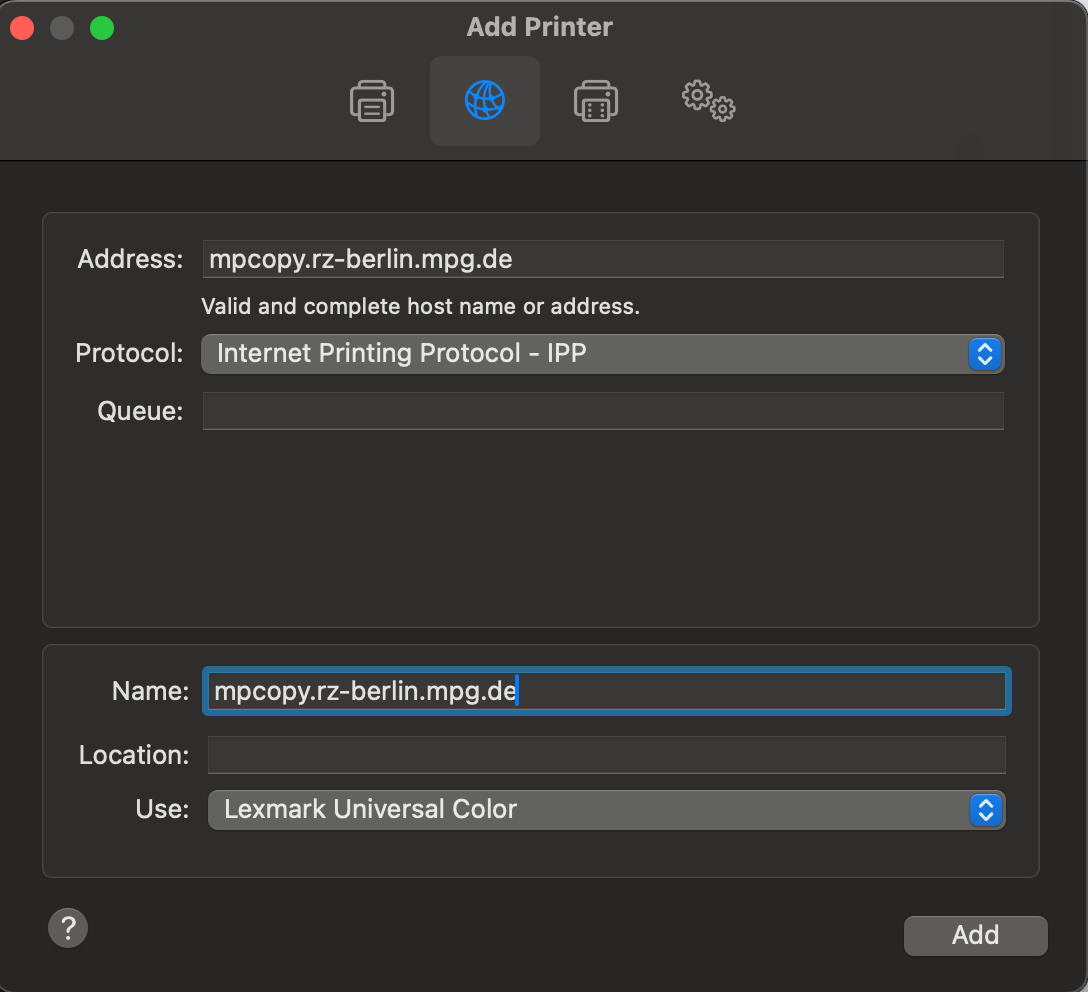
6. Click the "Protocol:" field and change it to " Internet Printing Protocol IPP"
7. Change the "Address:" field and enter the name or IP Adress of your printer
In our example it's "mpcopy.rz-berlin.mpg.de".
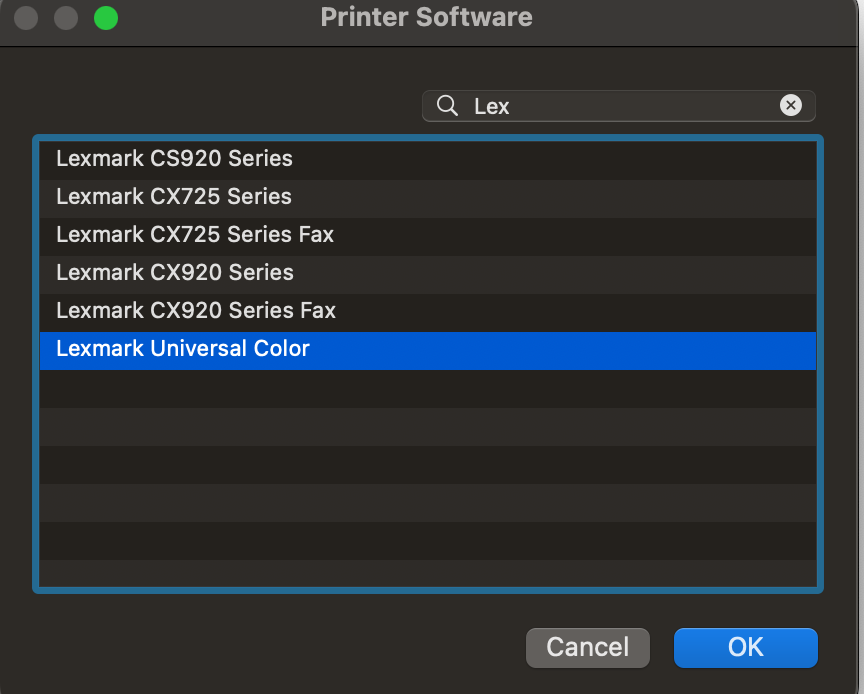
8. Click the "Use:" field and select "select software"

9. Search for Lexmark (or HP if it's an HP Printer) for it, and use the "Lexmark Universal Color" printer drive from the list.
10.) Click on Add to proceed
11.) Done with simple installation.
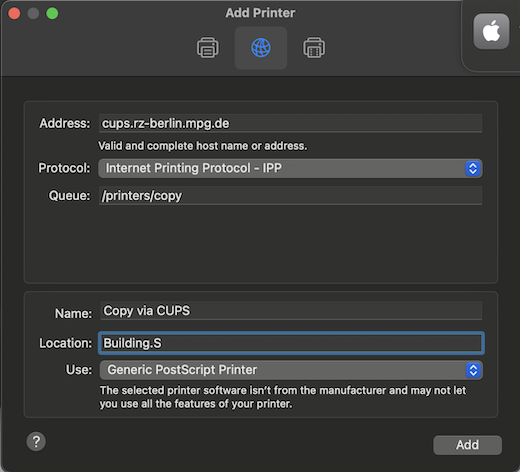
2. Printer installation for MAC OSX - CUPS (UNIX Print Server)
1. From the Apple menu choose System Preferences.
2. From the View menu choose Print & Scanners.
3. If the lower left padlock is locked, click it and enter an administrator name and password to unlock it.
4. Click the "+" (plus) icon at the bottom of the "Printers" pane to open the "Add Printer" window.

5. Select "World"-Icon on the toolbar.
6. Click the "Protocol:" field and change it to " Internet Printing Protocol IPP"
7. Change the "Address:" field and enter the name or IP Adress of your printer , In our example its "cups.rz-berlin.mpg.de".
8. Click the "Use:" field and select "select software"
9. Search for Lexmark (or HP if it's an HP Printer) for it, and use the "Lexmark Universal Color" printer drive from the list.
10.) Click on Add to proceed
11.) Done
Note: if you want to use the finishing options on Lexmark devices please do this: (Staple, fold, Trays )
A.) System Preferences -> Printers & Scanners -> Select the Lexmark Printer
B.) Select "Options & Supplies" -> Options
C.) Enable here the numbers of trays, and options of your printer (ask the it-responsible person)
Example:
9. Thats it
3. Printer installation for MAC OSX - ADPRINT (Windows Print-server)
1. Choose System Preferences from the Apple menu.
2. choose Print & Scanners from the View menu.
3. Click the + button to add a printer.
4. Press the Control key while clicking (or double click) the "Default" icon (or any other icon on the toolbar), then choose Customize Toolbar from the contextual menu that appears.
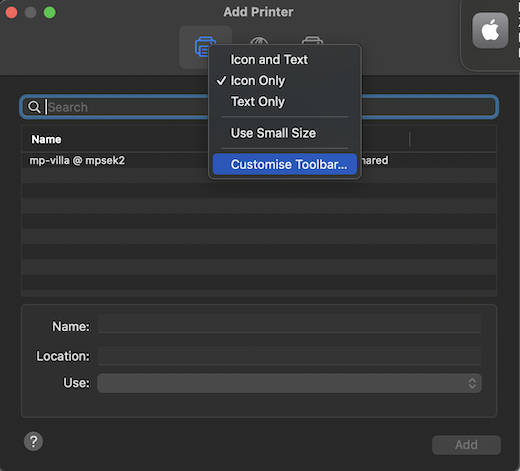
5. Drag the Advanced (gear) icon to the toolbar.
6. Click Done.
7. Click the Advanced icon that was added to the toolbar.
8. Choose "Windows printer via Spoolss" from the Type pop-up menu. Attach:spoolss.png Δ
9. In the URL field, type the printer's address in one of the following formats: -- smb://adprint.rz-berlin.mpg.de/printername
Note: Here is a full list of the available printers : http://adprint.rz-berlin.mpg.de/printers/
- use your fhi username and password *
10. In the Name field, type the name you would like to use for this printer in Mac OS X. Example:
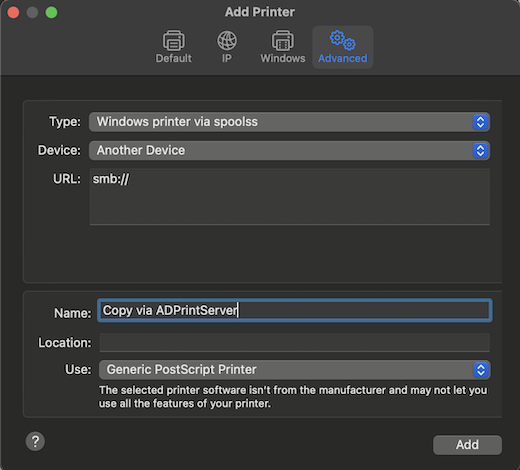
11. Choose the appropriate PPD or printer driver from the "Print Using" pop-up menu Note1: You can use the "Generic PostScript Printer" or you can get the PPD files here (connect as guest)
smb://cups.rz-berlin.mpg.de/support
use "select printer software.." for a ppd file)
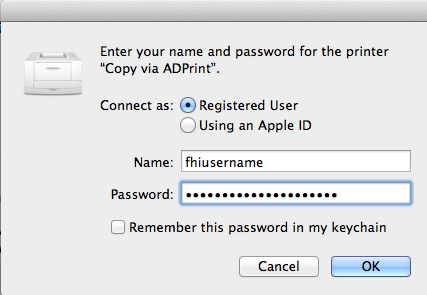
12. Thats it, for every printjob you will be asked for your fhi username and password!
3.1 Secure Printing - OSX 10.9.x and above guide
This works only when you're using the print server "adprint" and a canon image runner advance department printer with the correct drivers (PPD)
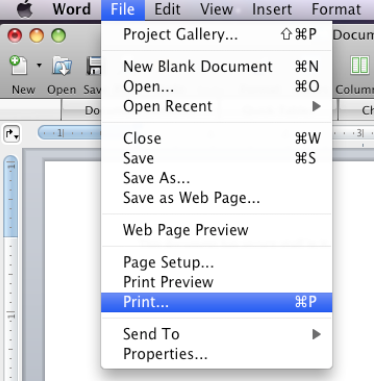
1. In your preferred application (word,thunderbird,firefox,... ) click file -> Print
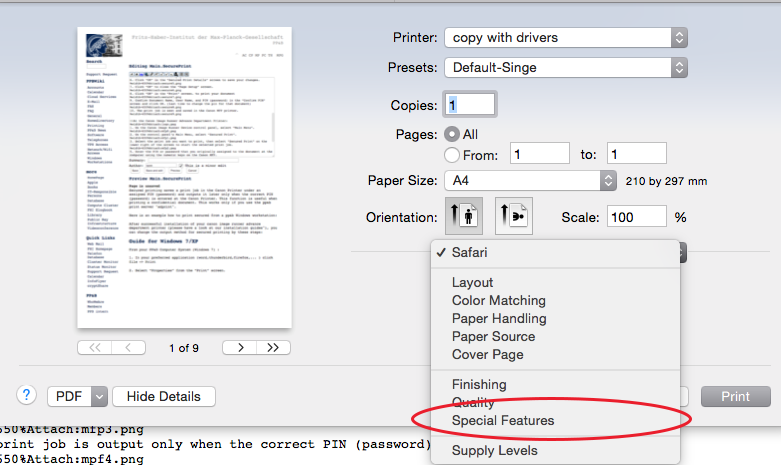
2. Next click on the 3rd pull-down and select “Special Features.
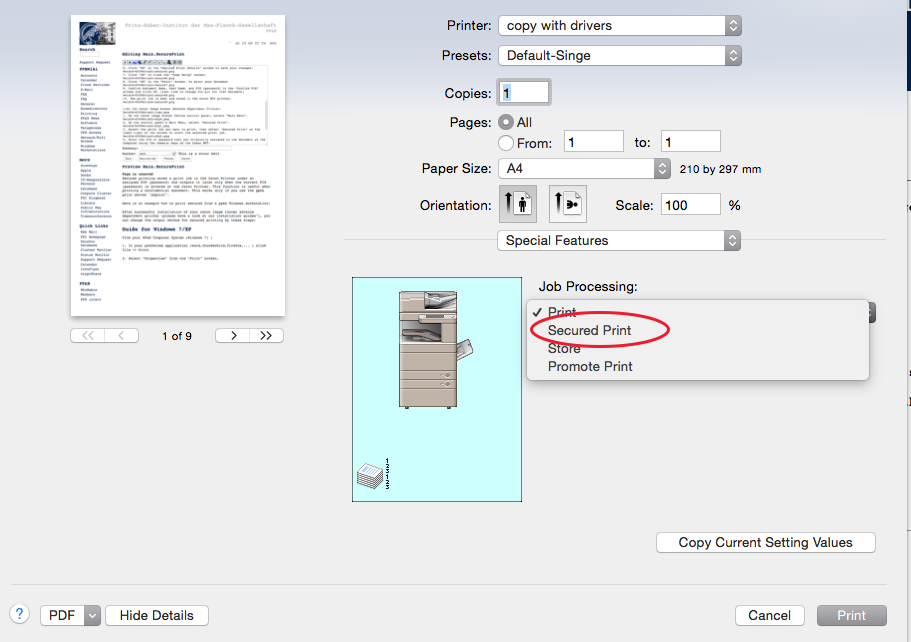
3. Next change the Output method from Print to Secured Print. Then click Print.
4. On the next dialog, make up a document name. On the username field, delete whatever is in there and type in your computer username all lowercase.In the password field create a numeric password. (Don’t forget it. You will need it later
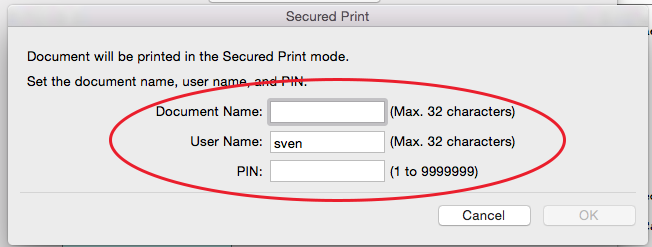
5.Click OK when finished.
4. At the Canon Image Runner Advance Department Printer:
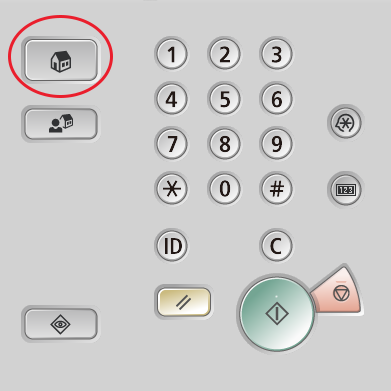
1. On the Canon Image Runner Device control panel, select “Main Menu”.
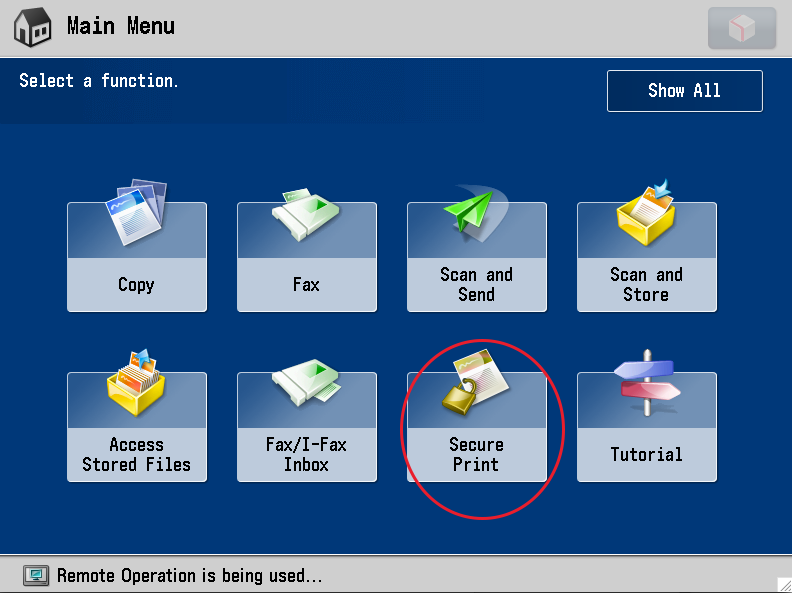
2. On the control panel’s Main Menu, select “Secured Print”.
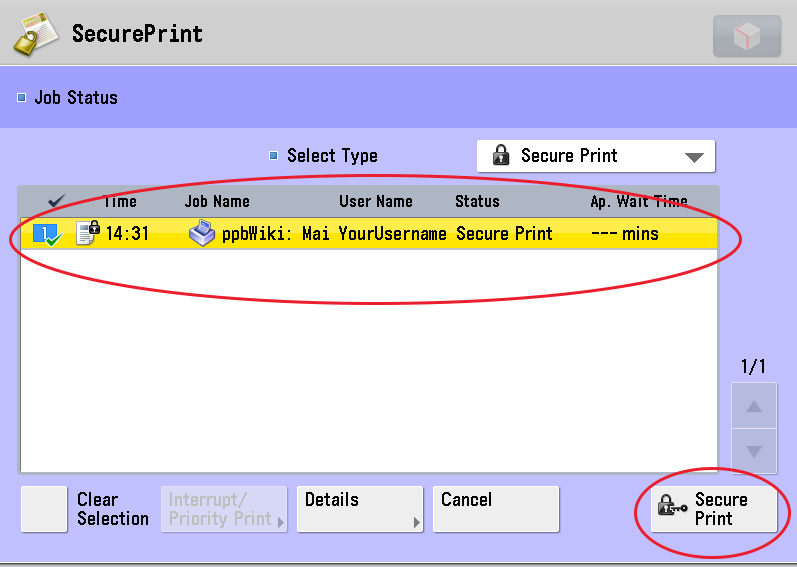
3. Select the print job you want to print, then select “Secured Print” on the lower right of the screen to start the selected print job.
5. Enter the PIN or password that you originally assigned to the document at the computer using the numeric keys on the Canon MFP.
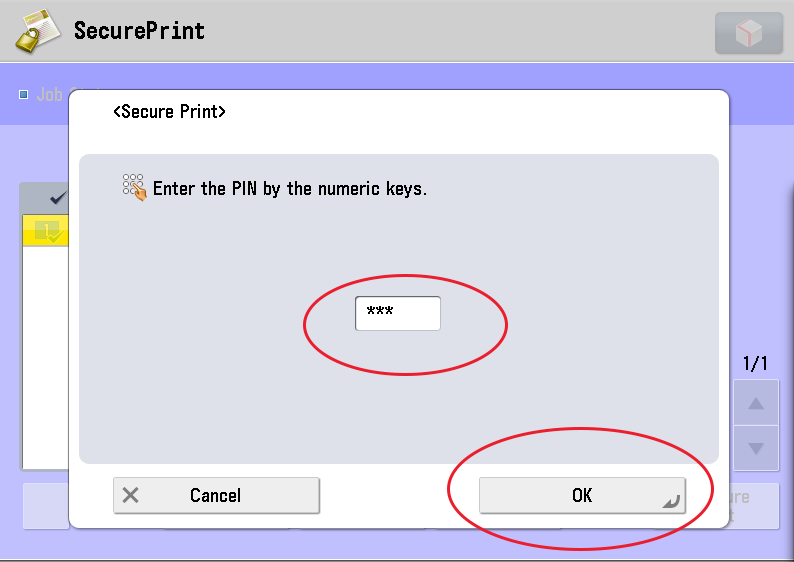
7. The print job is output only when the correct PIN (password) is entered.
5. Unix/Linux Printer Settings
Open a terminal window and gain super user rights: "# su -".
If you do not have the super user password for "root", you must probably (re)initialize the super user account:
# sudo passwd root
Follow the instructions (Password request and defining the new password for root).
By
# su -
and typing the password you will become the super user "root".
Alternatively, you can become super user "root" by:
# sudo -s
and typing your own password.
Now you edit the Cups client.conf with the following command:
# vi /etc/cups/client.conf
Look for
# ServerName? ...
and remove the "#":
ServerName? cups.rz-berlin.mpg.de
Now press Esc, type ":wq" and save the entry by "Enter".
Now restart, and all printers will be shown in the printer selection list.
IMPORTANT: You can control the operating status of your printer under http://cups:631/printers. (I think this should be http://localhost:631/printers.)