 e-Manual e-Manual | Top Site map Site map Help Help Glossary Glossary |
|---|---|
 Category Top
 Overview of This Function
 Advanced Space/Network Settings
 Mail Box
 Advanced Space
 Network
 Memory Media
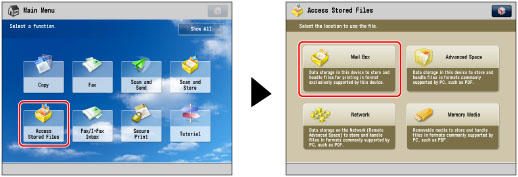
 Flow of Operations for Accessing Stored Files
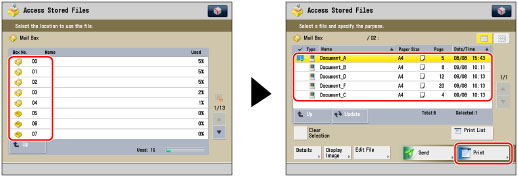
 Printing Files Stored in a Mail Box
 Printing Files Stored in the Advanced Space
 Printing Files Stored on the Network
 Printing Files Stored in Memory Media
 Cancelling a Job While Printing
 Reserving Jobs
 Arranging Files Stored in a Mail Box
 Checking File Information
 Previewing a File
 Operations for Files Stored in a Mail Box
 Printing Lists
 Arranging Files and Folders Stored in the Advanced Space
 Checking Detailed Information of the Advanced Space
 Personal Space Operations
 Folder Operations
 Checking File Information
 Previewing a File
 Operations for Files Stored in a Folder
 Arranging Files and Folders Stored on the Network
 Checking Storage Information
 Folder Operations
 Checking File Information
 Previewing a File
 File Operations
 Arranging Files and Folders Stored in Memory Media
 Checking the Detailed Information for Memory Media
 Folder Operations
 Checking File Information
 Previewing a File
 File Operations
 Printing a Sample
 Storing Print Settings
 Adjusting Density During Printing
 Merging Files When Printing
 Favorite Settings
 Storing Favorite Settings
 Recalling/Deleting Favorite Settings
 Changing Colour Modes
 Paper Selection
 Collating Prints
 Two-Sided Printing
 Convenient Modes for Printing
 Adding a Cover
 Inserting Sheets
 Booklet Mode
 Job Separator
 Shifting the Original Image Using the Numeric Keys
 Adding a Secure Watermark
 Document Scan Lock
 Document Scan Lock (TL Code)
 Document Scan Lock (QR Code)
 Superimpose Image
 Gutter
 Page Numbering
 Copy Set Numbering
 Watermark Printing
 Date Printing
 Adjusting the Colour
 Adjust One-Touch Color
 Print on Tab
 Adjusting the Print Resolution
 Printing with Halftones
 Adjusting Printing to Fit the Paper Size
 Enlarging the Print Area
 Printing Files with Multiple Pages on One Page (N On 1)
 Printing Comments
 Printing Password Protected PDF Files
 Enlarging and Reducing Prints
 Setting the Print Orientation
 Setting the Print Position
 Sending a File
 Unavailable Combination of Functions
|
IMPORTANT
|
|
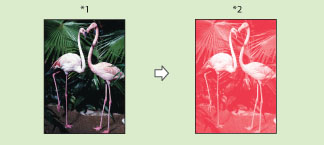
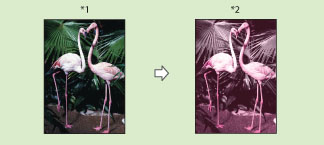
You can select Red, Green, Blue, Yellow, Magenta, or Cyan as the colour in the Single Color mode and the Two Colors mode.
Files comprised of black-and-white images stored in a mail box cannot be printed in the Two Color mode. Files comprised of colour and black-and-white images stored in a mail box can be printed in the Two Color mode.
|
|
NOTE
|
|
When printing CMYK files stored in mail boxes, only [Auto (Color/Black)] can be selected. (To print full colour CMYK files, only [Auto (Color/Black)] can be specified. To print black CMYK files, [Black] can also be specified.)
The Single Color mode and Two Colors mode are available for printing file from a mail box.
If a file comprised of colour and black-and-white images is stored in a mail box using [Store in Mail Box] of the Copy function or using Scan and Store function, and the file is printed in the Two Colors mode, black-and-white page is counted as a colour print. If a file comprised of colour and black-and-white images is stored in a mail box from a computer, and the file is printed in the Two Colors mode, black-and-white page is counted as a black-and-white print.
|
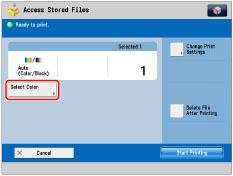
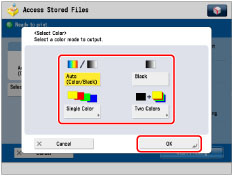
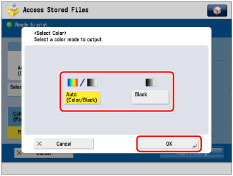
|
IMPORTANT
|
|
For information on the modes which cannot be set in combination with this mode, see "Unavailable Combination of Functions."
|
|
NOTE
|
|
If colour printing is performed after black printing, a message may appear indicating the machine is preparing for colour printing. Please wait for a moment until the message disappears. Colour printing will start when the message disappears.
If you select [Sepia Tone] in the Adjust One-Touch Color mode, the colour mode is automatically set to 'Single Color (Sepia Tone).'
The default setting is 'Auto (Color/Black).'
You can store the colour mode in [Change Default Settings]. (See "Changing/Initializing the Default Settings for the Copy Function.")
|