|
NOTE
|
|
The Inner Finisher-E1 is an optional product.
If the Paper Deck Unit-B2 is attached, move the paper deck unit away from the main unit before
proceeding with this procedure.
If there is paper in the output tray, remove the output paper before proceeding with this procedure.
If the Copy Tray-J1 is attached to the main unit, remove all output paper from the tray.
|

 CAUTION CAUTION |
|
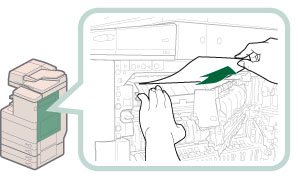
When pushing the paper output unit back into its original position, be careful not to get your fingers caught, as this may result in personal injury.
|
|
CAUTION |
|
When closing the upper and lower right covers of the main unit, be careful not to get your fingers caught, as this may result in personal injury.
|
|
NOTE
|
|
Gently close the covers until they click into place in the closed position.
If the Paper Deck Unit-B2 was moved away from the main unit, reconnect it to the main unit.
|
|
NOTE
|
|
The screen indicating the directions on how to clear the paper jam is displayed repeatedly until the paper jam is cleared.
|