Top Site mapHelpGlossary Site mapHelpGlossary | |
 Category Top
 Flow of Operations on the Settings/Registration ScreenFlow of Operations for Administrators Flow of Operations for General UsersSettings/Registration TablePreferencesAdjustment/MaintenanceFunction SettingsFunction Settings: CopyFunction Settings: PrinterFunction Settings: SendFunction Settings: Receive/ForwardFunction Settings: Store/Access FilesFunction Settings: Secure PrintFunction Settings: Web AccessSet DestinationManagement SettingsPreferencesPaper SettingsRegistering the Paper Size and Type for a Paper SourceDistinguishing A5 and STMT PaperRegistering/Editing Custom Paper TypesRegistering Multi-Purpose Tray Default SettingsRegistering/Editing/Deleting Custom Paper SizesDisplay SettingsDefault Screen after Startup/RestorationDefault Screen (Status Monitor/Cancel)Display Fax FunctionStore Location Display SettingsEnabling the Language/Keyboard SwitchChanging the Display Language/Keyboard on the Touch Panel DisplayChanging the Keyboard Shift Lock Feature SettingsDisplaying the Remaining Paper MessageNumber of Copies/Wait Time Status DisplayClean the Original Scanning Area Screen PromptSetting the Default Display of the Paper Type Selection Screenmm/Inch Entry SwitchDisplaying the Current Department ID/User NameTimer/Energy SettingsCurrent Time AdjustmentCurrent Date and TimeTime FormatQuick Startup SettingsAuto Reset TimeDefault Display after Auto ResetAuto Shutdown TimeAuto Shutdown Weekly TimerAuto Sleep TimeEnergy Consumption in the Sleep ModeAuto Sleep Weekly Timer SettingsSetting the Sleep Mode Exit TimeAccessibilityKey Repetition SettingsInverting the Screen ColoursAdjustment/MaintenanceAdjust Image QualityAutomatic Gradation AdjustmentCorrect DensityFine Adjust ZoomMaintenanceInitializing after Replacing PartsFunction SettingsCommonPaper Feed SettingsEnabling Paper Drawer Auto SelectionMatching the Print Side for 1-Sided and 2-Sided PrintingEnabling Timeout for Suspended JobsPaper Output SettingsAlternating the Print Output (Offset Jobs)Inserting a Job Separation Sheet between Print JobsInserting a Job Separation Sheet between Copy SetsPrint SettingsSetting the Printing PriorityOutputting Reports with Two-Sided PrintingRegistering/Editing/Deleting User-Defined Text for Page Numbers and WatermarksScan SettingsStreak PreventionColor Scan Speed/Image Quality PrioritySetting the Gamma Value for Remote ScansAutomatically Enabling the Remote Scanner FunctionAuto OfflineGenerate FileHigh Compression Image Quality LevelSettings for Creating Searchable PDF/XPS/OOXMLTrace & Smooth SettingsOOXML SettingsSpecifying the Minimum Version When Generating a PDFFormatting PDF Files to PDF/AOptimizing PDF for WebChanging the PDF Encryption Level from Acrobat 10.0 or Equivalent to Acrobat 9.0 or EquivalentCopyRegistering/Editing/Deleting Favorite Settings ButtonsChanging/Initializing the Default Settings for the Copy FunctionRegistering Shortcut KeysEnabling Auto CollatingSetting the Photo Printout Mode for the Copying FunctionSendOutputting ReportsCommon SettingsRegistering/Editing/Deleting Favorite Settings ButtonsDisplaying a Confirmation Screen When Recalling Favorite SettingsChanging the Default Screen for SendChanging the Default Settings for SendRegistering Shortcut KeysSend TX ReportCommunication Management ReportPrinting the TX Terminal IDAutomatically Deleting Failed JobsNumber of Retry AttemptsData Compression RatioGamma Value for YCbCr Send JobsDividing Data into Chunks When Sending with WebDAVConfirming the SSL Server Certificate When Sending with WebDAVE-Mail/I-Fax SettingsRegistering the Unit's Name for E-Mail/I-FaxCommon Communication Settings for E-Mail/I-FaxConfirming the SSL Server Certificate When Sending with SMTPConfirming the SSL Server Certificate When Receiving with POPMaximum Data Size for SendDefault SubjectSetting an Authorized User E-Mail Address as the Reply-to DestinationSetting an Authorized User E-Mail Address as the SenderAllowing Users Logged In as Guests to SendFull Mode TX TimeoutPrinting MDN/DSN on ReceiptSending Via a ServerAllowing MDN Not Via ServerSetting Autocomplete for E-mail Address EntrySpecifying the Fax SettingsChanging the Default Screen for FaxChanging the Default Settings for the Fax FunctionRegistering Shortcut KeysRegistering/Editing/Deleting Sender NamesSetting the Authenticated User Name as the Sender Name (TTI)Enabling ECM TransmissionPause TimeEnabling Auto RedialChecking the Dial Tone before SendingFax TX ReportFax Activity ReportFax Line SettingsSetting the Line to Use When SendingSend Start SpeedR-Key SettingRemote Fax TX SettingsReceive/ForwardOutputting ReportsCommon Settings2-Sided PrintingReducing a Received FilePrinting Received Images with the 2 On 1 LayoutPrinting Footer Information on a Received DocumentInterrupt Printing of Received JobsHandling Files That Fail to Be ForwardedForwarding SettingsStoring Forwarding SettingsWhen Forwarding Destinations Do Not Match the Forwarding ConditionsEditing Forwarding SettingsPrinting Forwarding SettingsSpecifying the Fax/I-Fax Inbox SettingsAlways Send Notice for RX ErrorsSpecifying the Fax SettingsEnabling ECM ReceptionFax RX ReportSetting the Receive Start SpeedSetting the Receive PasswordStore/Access FilesCommon SettingsSpecifying the Scan and Store SettingsSpecifying the Stored File SettingsMemory Media Settings
 Set DestinationPrinting the Address ListsRegister DestinationsRegistering an E-Mail AddressRegistering a Fax NumberRegistering an I-Fax AddressRegistering a File Server AddressRegistering a Group AddressAddresses Obtained via a ServerEditing Address DetailsDeleting AddressesNaming an Address BookRegistering One-Touch ButtonsRegistering/Editing One-Touch ButtonsDeleting One-Touch ButtonsChanging the Default Display of the Address BookLDAP Server Settings
 Registering an LDAP ServerEditing LDAP Server SettingsPrinting LDAP Server SettingsLDAP Server Auto SearchRegistering/Editing LDAP Search AttributesRegistering/Editing/Deleting Default Search Conditions for Each LDAP ServerObtaining the Remote Address BookRemote Address BookRemote Address Book Server AddressCommunication TimeoutFax TX Line Auto Select Adjustment
 (Settings/Registration).
|
<Port Number>:
|
|
|
Press
 for Port Number → enter a port number using for Port Number → enter a port number using  - -  (numeric keys). (numeric keys). |
|
|
<Max Addresses to Search>:
|
|
|
Press
for Max Addresses to Search → enter the maximum number of addresses to search using - (numeric keys). |
|
|
<Search Timeout>:
|
|
|
Press
for Search Timeout → enter the timeout time, in seconds, using - (numeric keys). |
|
IMPORTANT
|
|
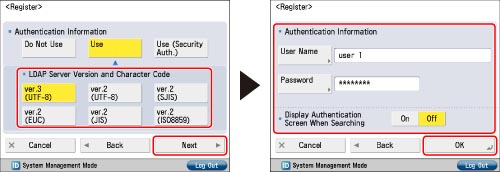
If you select [Use (Security Auth.)] for <Authentication Information> for the LDAP server and Reverse DNS Lookup (a function that looks up the host name from the IP address) is not supported, enter a host name instead of an IP address.
|
|
IMPORTANT
|
|
You can only select [Use (Security Auth.)] next to <Authentication Information> if the LDAP server is running on Windows Server 2003 with Active Directory or Windows Server 2008 with Active Directory.
If you entered an IP address in step 3, and Reverse DNS Lookup (a function that looks up the host name from the IP address) is not supported, select either [Use] or [Do Not Use].
If you select [Use (Security Auth.)] for <Authentication Information>, and the [Date/Time Settings] in [Preferences] (Settings/Registration) are different from the time settings on the LDAP server, the machine may not be able to connect to the LDAP server.
|

|
<LDAP Server Version and Character Code>:
|
|
Select the LDAP version and character code according to the LDAP server's environment.
|

| © CANON Inc. 2013 All Rights Reserved | Disclaimers CopyrightTrademarksOffice LocationsUSRM2-3056-01 CopyrightTrademarksOffice LocationsUSRM2-3056-01 |
|---|
 Expand all
 Collapse all
 Search options